pytest
简介
pytest是一个非常成熟的Python测试框架
- 能够支持简单的单元测试和复杂的功能测试,还可以用来做selenium/appnium等自动化测试,接口自动化测试(pytest+request)
- pytest具有很多第三方插件,并且可以自定义扩展,常用的插件有:
- pytest-selenium(集成selenium)
- pytest-html(完美html测试报告生成)
- pytest-rerunfailures(失败case重复执行)
- pytest-xdist(多CPU分发)
- 支持参数化,可以细粒度地控制要测试的测试用例
- 可以很好的和CI工具结合,例如Jenkins
https://docs.pytest.org/en/stable/
https://www.cnblogs.com/mytianying/p/12466302.html
编写规则
- 测试文件以test开头(以test结尾也可以)
- 测试类以Test开头,并且不能带有init方法
- 测试函数以test开头
- 断言使用基本的assert即可
1 | # test_whitebalance.py |
Console参数介绍
- -v 用于显示每个测试函数的执行结果
- -q 只显示整体测试结果
- -s 用于显示测试函数中print ()函数输出
- -x,—exitfirst,在第一个错误或测试失败时立刻退出
- -h 帮助
执行测试
- 配置PyCharm执行
- Tools -> Python Integrated tools -> Default test runner
- main方法
- pytest.main([“-s”, “-v”, “test_whitebalance.py”])
- 命令行
- pytest -s -v test_whitebalance.py
pytest标记
pytest查找测试策略
- 默认情况下,pytest会递归查找当前目录下所有以test开始或者结尾的Python脚本
- 并执行文件内的所有以test开始或结束的函数和方法
标记测试函数
由于某种原因(如test_func2的功能尚未开发完成),我们只想执行指定的测试函数。
第一种,显式指定函数名,通过“ :: ”标记
- test_whitebalance.py::test_func1
第二种,使用模糊匹配,使用-k选项标识
- pytest -k func1 test_whitebalance.py
第三种,使用pytest.mark在函数上进行标记
在项目中添加pytest.ini配置文件
[pytest]
markers=
do: do
undo: undo
1
2
3
4
5
6
7
8
9
10# test_whitebalance.py
import pytest
def test01():
print("test01")
def test02():
print("test02")- pytest -m do test_whitebalance.py
pytest参数化处理@pytest.mark.parametrize():数据驱动DDT
pytest参数化处理:使用参数化装饰器、解析列表、元组、字典等数据
- 在pytest中,也可以使用参数化测试,即每组参数都独立执行一次测试
- 使用的工具就是pytest.mark.parametrize(arguments, argvalues)
例子:
如需要测试用户登陆功能,假设需要4个用例
- 用户名正确,密码错误:
admin *** - 用户名错误,密码正确:
*** 123 - 用户名正确,密码正确:
admin 123 - 用户名错误,密码错误:
*** ***
1 | import pytest |
1 | # 元组 |
1 | # 字典 |
1 | # id值可以自定义,只要方便理解每个用例是干什么的即可, 主要为了增强可读性 |
@pytest.fixture()
@pytest.fixture() 用于定义一个标记,定义好了之后在其他的测试用例里面,作为第一个参数,来直接引用就可以了。
- 定义fixture跟定义普通函数差不多,唯一区别就是在函数上加一个装饰器@pytest.fixture()
- fixture命名不要以test开头,跟用例区分开。fixture是有返回值的,没有返回值默认为None
- 用例调用fixture的返回值,直接就是把fixture的函数名称当作变量名称
1 | import pytest |
pytest setup和teardown
- 作用:每次用例开始前和结束后都会去执行一次
- 还有更高级的setupClass和teardownClass,需配合@classmethod装饰器一起使用
- 在做selenium自动化的时候,它的效率尤为突出,可以只启动一次浏览器执行多个用例
简介
模块级(setup_module/teardown_module)开始于模块始末,全局的
即一个模块只执行一次
1
2
3
4
5
6
7
8
9
10
11
12
13
14import pytest
def setup_module():
print("setup_module")
def test1():
print("test1")
def teardown_module():
print("teardown_module")
if __name__ == "__main__":
pytest.main(['test.py', '-sv'])
函数级(setup_function/teardown_function)只对函数用例生效(不在类中)
即每次执行测试用例(函数)时,会去执行
类级(setup_class/teardown_class)只在类中前后运行一次(在类中)
1
2
3
4
5
6
7
8
9
10
11
12class TestCase01(object):
def setup_class(cls):
print("setup_class")
def teardown_class(cls):
print("teardown_class")
def test1(self):
print("test1 setup")
- 方法级(setup_method/teardown_method)开始于方法始末(在类中)
- 类里面的(setup/teardown)运行在调用方法的前后(在类中)
pytest allure生成测试报告
- 安装
- pip install allure-pytest
- 官方文档
- 下载allure
用例描述
| 使用方法 | 参数值 | 参数说明 |
|---|---|---|
| @allure.epic() | epic描述 | 敏捷里面的概念,定义史诗,往下是feature |
| @allure.feature() | 模块名称 | 功能点的描述,往下是story |
| @allure.story() | 用户故事 | 用户故事,往下是title |
| @allure.title(用例的标题) | 用例的标题 | 重命名html报告名称 |
| @allure.testcase() | 测试用例的链接地址 | 对应功能测试用例系统里面的case |
| @allure.issue() | 缺陷 | 对应缺陷管理系统里面的链接 |
| @allure.description() | 用例描述 | 测试用例的描述 |
| @allure.step() | 操作步骤 | 测试用例的步骤 |
| @allure.severity() | 用例等级 | blocker、critical、normal、minor、trivial |
| @allure.link() | 链接 | 定义一个链接,在测试报告展现 |
| @allure.attachment() | 附件 | 报告添加附件 |
1 | import allure |
使用pytest重构项目
- 继承unittest.TestCase修改为继承object
- unittest setup方法修改为pytest setup
- unittest 的断言修改为python断言assert
- 使用pytest依赖插件
- pip3 install pytest-dependency
pytest里面的用例的依赖关系,使用@pytest.mark.dependency()
假如test_category.py需要依赖test_admin_login.py模块的执行成功,需要下面这样写。
1 | # test_category.py |
日志
日志级别
| 级别 | 信息 |
|---|---|
| DEBUG | 最详细日志信息,典型应用场景是问题诊断 |
| INFO | 信息详细程度仅次于DEBUG,通常只记录关键点信息,用于确认一切都是按照我们预期的那样进行工作 |
| WARNING | 当某些不期望的事情发生时记录的信息(如,磁盘可用空间较低),但是此时应用程序还是正常运行的 |
| ERROR | 由于一个更严重的问题导致某些功能不能正常运行时的记录的信息 |
| CRITICAL | 当放生严重错误时,导致应用程序不能继续运行时记录的信息 |
logging模块的四大组件
- loggers提供应用程序代码直接使用的接口
- handlers用于将日志记录发送到指定的目的位置
- filters 提供更细粒度的日志过滤功能,用于决定哪些日志记录将会被输出(其他的日志记录将会被忽略)
- formatters用于控制日志信息的最终输出格式
POM设计模式重构项目
- POM页面对象模型是一种设计模式,用来管理维护一组web元素集的对象库
- 在POM模式下,应用程序的每一个页面都有一个对应的page class
- 每一个page class维护着该web页的元素集和操作这些元素的方法
- page class中的方法命名最好根据其对应的业务场景进行
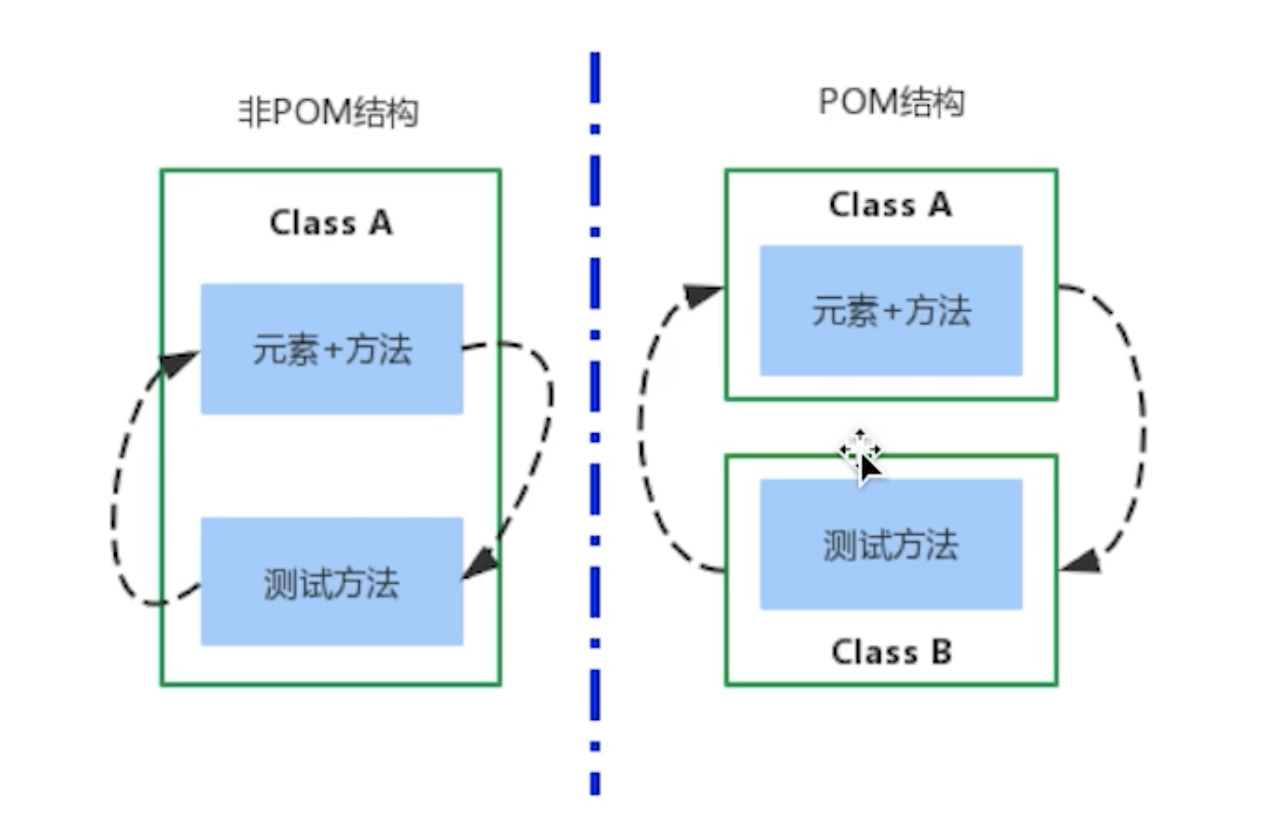
一个非POM的Web测试脚本如下:(测试和代码耦合在一起)
1 | import selenium import webdriver |
一个POM的Web测试脚本如下:(测试和代码解耦)
1 | # 页面类 |
持续集成和交付
Jenkins环境搭建
- 下载安装JDK
- 下载安装Jenkins